Advertisements
Showing posts with label Funny. Show all posts

Thursday, October 2, 2014

// // Leave a Comment

Downloading Windows 10

Hi,

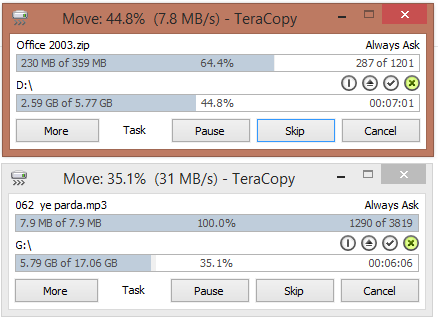
I was downloading Windows 10 Technical Preview this morning. When it was taking too long, I have asked my ISP to increase Bandwidth and they did.

Here is the screenshot. 30 MBPS, whoo! Incredible speed in India.

Feeling Excited. It is downloaded when I write this post. Will install and share some cool screens.

Keep visiting.
Read More

Sunday, September 28, 2014

// // Leave a Comment

How to Limit Bandwidth Per IP Address - MicroTik

Hi,

If you are administrator or manage network in your office, your most challenging work is to divide the bandwidth as per requirement of user and to stop un-necessary use of Internet Bandwidth causing slower internet for others.

Requirement/Background: 

Some of people always love to download songs, apps or other kind of digital data when they get Free Internet (that do not cost their own money). So they use most of bandwidth using Download Manager and other Accelerators.
If your internet connectivity is equipped with MicroTik devices like FirePro router or RouterBoard routers, here is the method to limit bandwidth per user/ip address.

Step 1: 

Login to router WinBox or Webfig using your Router Address and Username/Password. Default are admin/admin.

Step 2: 

Click on Queue Menu and click on Add button.

Step 3: 

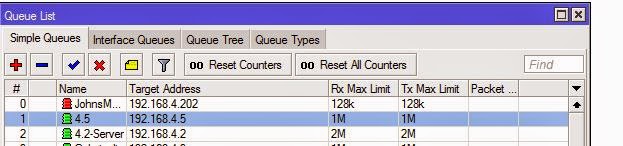
You will see following screen. Fill the form as filled in example screenshot. Click Apply and OK to close the dialogue screen.


Now, whenever, the particular IP address try to cross the bandwidth limit which is specified here, that will automatically marked Red and restricted the bandwidth. Lets be clear with following screen.

You have successfully put limit on user. Now the user can not cross the limit and the bandwidth will remain in flow.

You can also disable the Internet Access or Downloading or Uploading separately to particular IP address, without letting him know that we will discuss on next post.

Thanks for reading.
+John Bhatt  
Read More

Sunday, September 21, 2014

// // Leave a Comment

Feeling Awesome - Thank You

Whooo!

We are about to reach 1,00,000 Hits on this domain only.
Combined stats is about to reach 1,40,000 hits. 
This blog got 80,000 hits in last 8 months since our last announcement on 20 January 2014 on average of 10,000 hits per month. 

Keep supporting and your feedback are most welcome. 

Thanks from 
P.Yar.B Complex
Read More

Sunday, August 17, 2014

// // Leave a Comment

Change Display Style of Unread Mail - Microsoft Outlook

Hi,

It has been a long time since we posted any Microsoft Office article. Here we go with Microsoft Outlook. Our task today is To Change the display style of Unread Mail. By default, Microsoft Outlook shows unread message in bold Text or with different color based on Outlook Version.

I am using Microsoft Outlook 2013 (MS-Office version 15.0.xx) in this tutorial. Below is our Expected Result. Above is the default view in Microsoft Outlook 2013 and below is the modified view for Unread Messages. We can follow the same steps to customize formatting styles for different conditions.

Procedure

Step -1 : Click on View Pane, Choose View Settings from Current View section. You can do this directly clicking in Column Headers.

Step -2 : You will get following screen. Choose Conditional Formatting. This is Conditional Formatting window where we change default Rule for selected view. We have selected Unread Message in above case. Then Click on Fonts Button to proceed next. You can also Add new Rule to rule list.
Step -3 : Now change the Font Name, Color, Style, Effect, Size etc from Font Wizard screen. Have a look at below screen.
Ok, you have made the required changes, Restart Microsoft Office Outlook to reflect changes. Your new unread mails will be displayed with new formatting.

Thanks for reading. Hope you find our post helpful. Please share among your friends and social network to help us growing. Feedback and suggestions are always welcome.
+John Bhatt 
Read More

Friday, August 15, 2014

// // Leave a Comment

Happy Independence Day

Hi,

Wishing all my Indian Friend living in India and abroad a very happy Independence Day. Memorize the struggle done by leaders and Martyr.

-
From P.Yar.B Complex
Read More

Friday, July 11, 2014

// // Leave a Comment

KitKat update for Motorola Moto E

Hi,
If you are using Motorola Moto E, here is the great news. As motorola has announced on 5th of this month regarding KitKat 4.4.4 update, they have released update today.

Check screens below.


Tap on Setting > About Phone > System Updates if you did not get any notifications.

Oh yes, It is approx 57.9 MB in size, so you can easily download it over mobile data connection.

Enjoy your update.

Thanks for reading. 
John Bhatt
Read More

Wednesday, June 25, 2014

// // Leave a Comment

Microsoft Excel : Formula Result not showing

Hi,
Lets get known to a common Microsoft Excel issue.

Issue/Problem

Last day, I was working with a file in my office. That file was in Microsoft Excel format and I have to analyze data. When placing some formula, I noticed, excel is not calculating formula.
Lets be clear with following screenshot.

I tried many thing, Converted File to older format, newer format, opened and closed in other system and many other tricks but no one worked.

Actual Cause

Then suddenly I show the Format of the textbox where formula is placed. That is of kind Text and was the actually reason for not calculating formula. Microsoft Excel treats everything as normal Text string while placed or formatted as Text.

Solution

I have following two simple steps and Results are back.
Step 1: Changed formatting of Cell to Number which is of course my data type for the result. Lets have look at below screen to be more clear.

Step 2: Clicked in Cell to go to edit mode and pressed Enter key without any modification as formula was correct. Have a look at this screen to confirm.
Problem solved.

If you find my posts helpful, do not forget to share on social network or with your friends. Suggestions and feedback are awaited and always welcome.

+John Bhatt 
Read More

Friday, June 13, 2014

// // Leave a Comment

SLC 2070 Result Published

Hi,

Office Of The Controller Of Examinations has published result of SLC examinations taken on 2070 BS. Meanwhile, result is not available to view, we have downloaded their database and uploaded to our website. You can follow below link to get your result.
http://www.johnbhatt.com/Results.aspx


http://www.johnbhatt.com/Results.aspx

Congratulations and All the Best for all students who passed, for those students whose roll number is not in list, do not worry, you can check your marksheet soon and final result might change.

Thanks,
+John Bhatt 
Read More

Saturday, May 10, 2014

// // Leave a Comment

Funniest Wrestling Match

Hi,

Its fun time now. I am sharing you a recorded copy of a wrestling match which is recorded from TV.

Enjoy. No rights reserved. 
Read More

Friday, May 2, 2014

// // Leave a Comment

Problem Opening Office Documents

Hi,
Today I want to tell you about a common problem that you must have faced if you are still using MS Office 2003. When you tried to open the document created by Ms Office 2007, 2010 or 2013 by default this is in different extension and shows error while opening in lower version. To escape from this problem you either have to uninstall your MS Office package and upgrade to higher version (at least MS office 2007) or Ask the author of file to send a compatible file in Office 1997-2003 version.

But here is a best way that you can try without any cost and without any request.To open all types of Office Documents that are of created with higher versions of MS Office, you can download Office Converter. Microsoft has published it as Compatibility Pack for 2007 Office System.

You may follow the link to downnload Microsoft Office Document Converter.
Steps:

  • Save Downloaded file to disk.
  • When download completes, run the executable file.
  • Proceed to installation.
  • When complete, reboot your system.
This will install all rendering engine in your Office 2003 and you can open your existing files as well as files with newer version.


+John Bhatt

Read More

Wednesday, April 23, 2014

// // Leave a Comment

Twitter Updated its Layout

Hi,

If you are using Twitter, here is a good news for you all. Now twitter has updated its layout and made similar as Older Facebook layout. It has 3 columns and based in your screen resolution, it reduce to 2 column.
Some of the new features are as below.
Big Profile Photo
Bigger Header Image

Feature to Filter Tweets
When you Joined Twitter
Bigger notification for Followers profile
Ability to Pin Ability

Custom size for Tweets according to their popularity
There are a lot of new features also available. You are requested to visit and check yourself.
Reference: Aakarpost
Thanks for reading. Please provide feedback and comments and do not forget to share.
+John Bhatt 
Read More

Wednesday, February 26, 2014

// // Leave a Comment

Adding META Keyword Dynamically in Blogger

Hi,

Welcome back to our Blogger Tutorial series. Most of the blogger have good knowledge of SEO. They have used various blogging platform and use different plugin for SEO enhancement. Search Engine Optimization, commonly known as SEO is a method or way or process of effecting the visibility of your website among different Search Engines for better traffic and ranking. There are many paid advertisements among different Search engine but they are not considered part of SEO.
Whatever they do, coming back to our topic, we are talking about Keywords. META description and Keyword are the best approach for search engine. META description show the excerpt of your post or blog while searched. And Keywords are useful to match with the query text from user in search box. Lets illustrate using below graphical presentation.

But if you are using Blogger, there is no plugin for making your blogs SEO better, you have to do it yourself. If this article, I will tell you, how to add META Keywords dynamically according to post in your Blogger blog. You can set static keywords by modifying template code in simple steps but adding dynamic content is somehow tricky. 

Dynamic Meta Keywords

Lets move to work. Start with logging into blogger. Points are described step by step.

  1. Click in Template Link in Left side.
  2. Click on Backup / Restore button at right corner.
  3. Click on Download Full Template and save at safe place. In case something goes wrong, you will need this before cursing me.
  4. Now click in Edit HTML button just below snapshot preview of your blog template.
  5. Search in Template using CTRL+F and find for keywords.
  6. If there is already a link containing Meta Keyword, replace its value with below one or if there is no keyword then search for </title> and add below line just below that.
    <b:if cond='data:blog.metaDescription != ""'>
         <meta expr:content='data:blog.pageName + ", " + data:blog.title' name='Keywords'/>
    </b:if> 
    
  7. Save your template.
If you have following all steps I mentioned, congratulation you have successfully set your post title as keyword in Blogger. You can check this by viewing source code in your browser.

In our next post in this series, we will be discussing about how to add Labels in Blogger Meta Keyword section dynamically? Till then, keep reading. Do not forget to share or provide feedback.

All the Best.
Read More

Sunday, February 23, 2014

// // Leave a Comment

Torrent : Disadvantages and Controversies

Hi,

In a previous post about Torrent, I have explained working mechanism and origin of BitTorrent protocol and its use. If you missed, you may want to read that post at http://www.pyarb.com/2014/01/introduction-to-torrent.html. We also learnt about the advantages of Torrent and shared some snapshots also.
Now on continuation of that series, lets talk about its dis-advantages.

Disadvantages:

Torrent has many advantages like saving of time, peer to peer distribution, advance download experience for slower connection, it has many disadvantages too. Some of its dis-advantages are as listed below.

  1. No one can tell what is inside file until he finish downloading. Suppose creator told that it is Linux distribution with of Ubuntu's latest version and named file as resembling one. But no one can guaranty what is inside file actually until user finished downloading and open file. In case of illegal content or provider did not supplier any hash or MD5 sum over public, it can not predetermined. 
  2. For the first time, seeder must be online and seeding until the torrent gets popular. Or he must be always online to serve file and that too with higher internet speed. If he left in between, no one will get the file and users who downloaded some part will stuck at that point.
  3. Internet speed and computer performance is used by Bit-torrent protocol. Mostly upload speed of Internet is used to serve file and which may cause other services that depends on Internet to freeze.
  4. If the distribution has started once, it is hard to stop. If file gets popular and seeder thinks of stopping the distribution, it is impossible to stop until all users downloading torrent stop. That does not remains the property of creator.
  5. Un-authorized distribution has created a very big loss to most Software, Game, Movies and Music vendors. Some of users who paid for it distributed file over Internet using Torrent and that gets popular within minutes. Which caused loss in business. Many copyrighted materials are licked and distributed. Sometimes, the content is hijacked and distributed creating huge financial loss and reputation damage intentionally.
  6. The speed can not be stable (in most cases it is slow) and predetermined, depends upon the number of Seeders but that can not guaranty the speed. 
  7. File is served in pieces from different servers, so sometime result may be damaged or corrupted file.
  8. You can not use Download Managers or Accelerators to increase speed. 
  9. Source of media (file) is unrestricted. Illegal content hosting is very cheap and reliable using Torrent. If you own a website and host a copyrighted file, your web host may send you notice and if you do not stop your account may be suspended, but while using Torrent, no one is there is to stop except your ISP (Internet Service Provider).
  10. Torrent has great role on increasing Pornographic content over internet.
  11. If you are using Static IP to use Internet, there is privacy concern. Everybody downloading that torrent file can see your IP address and know what you are downloading.
  12. You must have a good Antivirus program, because sometime the torrent comes with Virus.
  13. The original content can not be altered once after serving started. For new versions or modified files you must create another torrent and share this While in case of direct download if the file changes in server, all users will get newer file automatically.
There are many other dis-advantages in case of Bit-Torrent system. You can add your own.

Controversies

Torrent has been always in Controversies since its early age. However it was created with a good motive, but it was being used to distribute copyrighted, paid, legal and sensitive data free of cost. Which caused lots of reputation and business loss to Software giants and specially Multimedia productions like Sony, Warner Bros, Universal and other many. The users uploaded the Paid Blue Ray discs or DVDs of movie and songs to torrent community causing birth to unstoppable piracy.
Some of the countries and authorities have declared Torrent safe and good while some other authorities put restrictions over torrent. Resulting many of the torrent site to legal threats and court cases. The most controversial website related to Torrent is ThePirateBay, TPB in short. TPB was founded by a Swedish group of members who are against copyright matters and want the content over internet to be shared free of cost. Which resulted them Lots of Penalty, many legal cases in different courts over globe, ban of their website on most countries. Instead of stopping their service, they started to display legal mails from Different high profile companies like Microsoft, Apple, Universal Studio and so many in their website publicly. Members who supported TPB including web hosting company and financier are also jailed for some month due to these controversies. Their server was attached multiple time by Internet authorities and other hackers who are against Torrent. But they are still stand and serving contents regularly. 
Other some top website examples are Supernova, TorrentSpy, Demonoid, etc which are on controversies due to serving Torrent file or indexing them.

If you have any suggestions of feedback about the post and our contents, do write us as comment or contact page. Till then keep visiting.
Read More

Thursday, February 6, 2014

// // Leave a Comment

[Solved] Music Library not showing in Music App (Windows 8)

Hi,

I have been using Windows 8 since its early release. I have downloaded Developer Preview in November 2011. I am not sure after that how many times I have installed Windows on my Computer and upgraded its version to Consumer Preview, Release Preview, Windows 8, Windows 8 Pro, Windows Blue Preview, Windows 8.1, Windows 8.1 Pro. Might be due to many installation and security (encryption and decryption, consequent owner-user change) there must be some loss in system volume information file of of hard disc partitions.

Problem

The actual problem has arise after last upgrade. Music App in Windows 8 has left showing songs that is stored in hard disc of computer. I have tried several methods that are suggested and logical.

Situation

Out of 500 GB hard disc, approx 250 GB is filled with Videos (movies) and approx 20 GB is filled with music. Rest of space is consumed by software and other documents. So the 50 GB partition is assigned to Windows and this is the partition which is formatted frequently.

Failed Trials

However, I love Windows Media player and use this as default but being a tester, I never gave up to find the reason behind not listing of library content. I have tried following tricks or methods to solve this problem. 
  • Un-installed application and installed from Store.
  • Cleared all temporary data for application and restored its setting.
  • Changed location setting to United States or United Kingdom but none of them worked.
  • Changed Microsoft Account to local account.
  • Re-installed windows using Clean format.
  • Many more tricks that are suitable as condition and found in various social sites or as suggested by Microsoft support personnels.

Actual Problem

While none of above trials worked, I got confused and search in depth about working mechanism of Music application. Then I opened Library setting in Media player and found a wired term, which got my attention. This is showing non responsive in front of library location. Then I searched and opened Search Indexing Options in windows 8. I tried to add the audio folder in indexing location but that drive is not showing there, so that did not worked too.

The Trick

When searching for that problem, somewhere over internet I found a solution. You want to know the trick huh....
Suggestion 1: Well solution is to delete your partition, format location and re-create the partition to get its state back as it was.
Suggestion 2: Reset permission, user from security settings in drive.
First is nearly impossible for me. After following many tricks, I finally came with some solution.

I did some trick, rather than deleting partition and formatting and getting its state back, 

I moved music data to another partition which was showing properly in Search Indexing option.

In Quick:

  1. Check if you have added folder to music library. 
  2. If first step is OK, then check the status in Windows Media Player> Right click on Music in left navigation (Library view) > Manage Music Library.
  3. If this is showing non responsive then move files to other partition.
  4. If showing OK or nothing special remark, type Indexing service in smart screen.
  5. Open Indexing Service Options and click on modify to add your audio folder.
  6. Close the Indexing Options screen once you finish selecting folders. This will solve your all problems.

Finally this solved the problem for now. 

But that was too hard when you have situation like mine.
Do not forget to leave comment.
+John Bhatt 
Read More

Saturday, February 1, 2014

// // 9 comments

HTTP Error 500.23 - Internal Server Error in Visual Studio 2013

Hi,

I have installed Visual Studio 2013 in my system. Due to some problems, I got the release after few months. So I was excited to use it and taste its new features. One thing I like about Visual Studio 2013 is it has a theme which turns it like Visual Studio 2010, which was simply awesome.

HTTP Error 500.23

I opened a existing website and tried to run that website. The website was using ASP.NET framework 4.0. However, the website has no errors and working fine in previous version of Visual Studio. But when I started with debugging (F5), this produced following error.
HTTP Error 500.23 - Internal Server Error

An ASP.NET setting has been detected that does not apply in Integrated managed pipeline mode.

Solution

I can not understand the problem in a single view, as it suggest to change some configuration different methods in things you can try section. While there is not handler configured in web.config system for Web Server. Instead there was no system.webServer node.
So I searched in Internet and found some suggestion to make changes in Application Pool setting in IIS Manager. I tried that too but that was also a failed trial. Then suddenly I got a click in my mind and tried a setting which worked immediately.
How can the change done in Internet Information Service (IIS) Manager reflect in Development server. When we run the website from Visual Studio it loads in development server instead of IIS. So we have to make change in Development server which will automatically solve all the problems.
I thought, some time you might have same situation and solution must be there before problem.
Step 1: Open visual studio and click in the name of Website Project currently opened. Click on Property pane
.
Step 2: Double click on Managed Pipeline Mode. This will toggle between Classic and Integrated Mode. You have to switch to Classic mode because the error was "An ASP.NET setting has been detected that does not apply in Integrated managed pipeline mode"
.
Now hit the F5 button, here goes output as usual.

You have solved the problem. If you find this post helpful, do not forget to share with friends or simply say thanks in comment below or you can share your feedback by leaving comment below.
+Prithvi Raj Bhatt 
Read More

Thursday, January 30, 2014

// // Leave a Comment

Adding CommentLuv in Blogger

Hi,
Once again, a new post for all blogger friends. As you are aware, the quality back-link has great value in website ranking. Most of blogger want to increase their ranking on various measurement tools and follow many tricks. They use many tools available over internet.

CommentLuv / IntenseDebate

In case of blog, one of the most used and must have feature is comment system. You should know what your visitor think about your post, so there should be a commenting system which is powerful, can protect spam, give you ability to control them and other administration features. Disqus is one of the most used commenting system. Another powerful and most used commenting platform is CommentLuv from IntenseDebate. This is an Automattic product. Automattic is company which made WordPress, JetPack, Askimet and other web products which are used by approx 70-80 % of web-masters. So by default, CommenLuv comes with Askimet spam protection which is actually powerful and blocks spam without any extra effort. Best thing about IntenseDebate is it is free. We will learn how to integrate CommentLuv comments with blogger template so that our blog can display and work with IntenseDebate commenting system.

Procedure

  1. Open http://intensedebate.com/signup.
  2. Fill the required details, If you have already got a WodPress.com account, you can login using WordPress API.
  3. If you are registering for first time, you must confirm your email id. Check you inbox and confirm email.
  4. Login to intensedebate.com using your username/password.
  5. Click on Sites menu and choose Add Blog/Site or navigate to https://intensedebate.com/install

  6. Put the domain of your blog. They have great support for Blogger. You can put your custom domain or blogger.com domain name and click next.
  7. This is choose your platform screen. Currently they have automated tools for WordPress.org, TypePad, tumblr and Blogger. Click on Blogger button. Remember, classic blogger is not supported.
     
  8. Now the next step is to login to blogger. Remember, you are using Modern version of Blogger. Navigate to Template section.
  9. Click on Backup/Restore button on right top corner. 
  10. You will be asked to download the template or upload. Click on "Download Full Template" button.
  11. Save this XML file (blogger template) to hard disc. Now navigate back to IntenseDebate website.
  12. Next screen is installer screen for blogger. There are some steps. They will ask you either you want to put commenting system in all posts or in new posts only. Selecting All posts will delete all older comments made using Blogger comment system. So this is not recommended if you have lots of comments in website earlier.
  13. There is a File Upload button in Step 5, click on button, upload your newly saved XML template. The rest is on IntenseDebate.
  14. Once file is uploaded, they read content and place all settings and codes themselves in template and write all code in a textbox.
  15. Now copy all that text and navigate to blogger. Click on Edit HTML button. 

  16. Replace all content in editor and click on Save Template button. Your all existing script customizations, texts, widgets will remain same and as per your settings, you can see the IntenseDebate commending system enabled in your blog posts.
You have successfully completed the installation of IntenseDebate commending system in your blogger powered blog. Leave feedback about your reading experience. Your feedback will help us to improve.

Thanks for reading.
Read More

Wednesday, January 29, 2014

// // Leave a Comment

Story behind OneDrive - Microsoft re-branded SkyDrive

Hi,

Some time ago, I have written a blog post about introduction to SkyDrive. Microsoft has publicly announced to Re-Brand the SkyDrive with new name and it will be called OneDrive.
Now skydrive blog and website are also available with new name OneDrive. As in the official blog post from Microsoft at http://blog.onedrive.com/onedrive-for-everything-your-life, "Of course, changing the name of a product as loved as SkyDrive wasn’t easy."

Story Behind Re-branding

Microsoft has launched SkyDrive in 2007. But a British television broadcasting company SkyDigital (BSkyB) filed a Trademark violation case for the use of word "Sky" against Microsoft in 2013. Later Microsoft and BSkyB made a agreement and Microsoft agreed to change the name of it's cloud storage service within reasonable period of time. Five months later, based on this, Microsoft has decided to change its name to OneDrive and publicly announced on 27th January 2014.

OneDrive

"Why OneDrive? We know that increasingly you will have many devices in your life, but you really want only one place for your most important stuff.As said in Preview website, some new features are expected one this version with New Brand name. Microsoft can increase storage capacity and expected to launch premium plans with more storage.

References

BBC News: Microsoft made to rename Skydrive after BSkyB victory
Wikipedia  : SkyDrive
OneDrive Blog : OneDrive for Everything in Your Life.
Note: Text in Italic is copied from references.
We will keep you posted on further changes and announcements. Keep reading.
+John Bhatt 
Read More

Thursday, January 23, 2014

// // 3 comments

RichTextBox in a single textbox among multiple TinyMCE

Hi,
Some time ago, I have written an post about integration of TinyMCE editor in ASP.NET website. The same was also published in CodeProject and most visited article of mine. While answering comments there, I got a request from one of reader.
His question is, "I have used TinyMCE Rich TextBox in my application but in my web form i have mulitple mulitiline TextBox. what I want that Rich TextBox should be bind to only one text box not all TextBoxes."

Situation

So the solution is here. Lets create a scene as below.

Here we have to convert TextArea for about to Rich Text Editor (WYSIWYG). Lets view source code of above design. I have tried to use simple HTML5 tags. So that other users can also get advantage of this tutorial.
 <%@ Page Language="C#" AutoEventWireup="true" CodeFile="Default.aspx.cs" Inherits="_Default" %>

<!DOCTYPE html>

<html>
<head runat="server">
    <title>Rich Text Editor in Single TextArea among many</title>
</head>
<body>
    <form id="form1" runat="server">
        <h1>Rich Text Editor in Single TextArea among many</h1>
        <fieldset>
            <legend>Profile Update</legend>
            <p>
                <label>Name</label>
                <input type="text" id="txtName" runat="server" />
            </p>
            <p>
                <label>Gender</label>
                <input type="radio" name="Gender" id="radioMale" runat="server" value="Male" />
                <input type="radio" name="Gender" id="radioFemale" runat="server" value="Female" />
            </p>
            <p>
                <label>Email ID</label>
                <input type="text" id="txtEmail" runat="server" />
            </p>

            <p>
                <label>About</label>
                <textarea rows="5" cols="50" id="txtAbout" class="Editor" runat="server"></textarea>
            </p>
            <p>
                <label>Remarks</label>
                <textarea rows="2" cols="50" id="txtremarks" runat="server"></textarea>               
            </p>
            <p>
                <asp:Button ID="btnSubmit" Text="Submit" runat="server" />
                <input type="reset" value="Clear Form" runat="server" />

            </p>
        </fieldset>

    </form>
</body>
</html>
Here we are using TinyMCE version 4.0.xx. This version is major upgrade and has completely different look and internal architecture compared to version 3.xx. So here is some difference in its integration.
If you are not familiar with this process, please read our previous post, that will describe you about Copying required files in project directory and inserting script in more details. Insert below code before closing of head tag in your HTML page.
<script src="script/tinymce/tinymce.min.js" type="text/javascript"></script>
    <script type="text/javascript">
        tinymce.init({
            selector: ".Editor",
            theme: "modern",
            plugins: ["lists link image charmap print preview hr anchor pagebreak"],                        
        });
    </script>
</head>

Notable

Notable and new code in above integration script is selector tag. This is new included tag in TinyMCE version 4.0.xx. This gives us below options.
Do not forget to change the path to Script as per you folder structure.
  • selector : "textarea"

    : This option will convert all TextAreas in visual editor. 
  • selector : "textarea.Editor"

    : This option will select all TextAreas with CSS Class Editor applied.
  • selector : h1.Editor

    or div.Editor : This option will change this to Inline editor for H1 or DIV with CSS class name of Editor.
As you see in code of scene designed above. you can see that we have applied class Editor which we did not created in any css file to one of the TextArea. Here we used this method.

Older Version

If you are working with TinyMCE version 3.xx, here is the code to be inserted in Head section of HTML page. 
 <script type="text/javascript" 
src="script/tiny_mce/tiny_mce.js"></script>
    <script type="text/javascript" language="javascript">
        tinyMCE.init({
            // General options
            
            // mode: "textareas",
    
    // Set mode to Exact.                       
            mode: "exact",  
            
            // Write the name of ID of TextArea where you want editor to appear in element property.
            elements : "txtRemarks", 

            theme: "advanced",
            plugins: "pagebreak,style,layer,table,save,
            advhr,advimage,advlink,emotions,iespell,inlinepopups",
           
        });
    </script>

Output


Now, the output of above work is below.
Its perfect.
If you find this article helpful, drop a comment or share with your friend.
+John Bhatt

Read More

Monday, January 20, 2014

// // Leave a Comment

Add SyntaxHighlighter to your blog

Hi,
This post is about all Blogger, who write code and want to share their code on their website of community. If the code is in HTML, JavaScript or other browser understandable language, browser renders and displays output instead of code. Visitor will see nothing instead of garbage while in case of other programming languages, formatting, wrapping, alignment and other styles are lost and user is confused about its actual structure.

To remove this we are going to implement SyntaxHighlighter functionality in our blog. Here we will work with Blogger blog, the method is same for html webpage. SyntaxHighlighter is a JavaScript library written by Alex Gorbatchev in year 2004. Because of its feature, it becomes more famous and still maintained at his website.

Procedure

Include the JavaScript files in head section of your website code using External Script linking method. For blogger, open your Template and search for closing of head tag.
</head>
Then paste these links for including files. You can also download latest version from http://alexgorbatchev.com/SyntaxHighlighter/ and use in your own web host also but blogger does not allow you to upload JavaScript files.
<link href='http://www.johnbhatt.com/SharedResources/styles/shCore.css' rel='stylesheet' type='text/css'/>
<link href='http://www.johnbhatt.com/SharedResources/styles/shThemeDefault.css' rel='stylesheet' type='text/css'/>
<script src='http://www.johnbhatt.com/SharedResources/scripts/shCore.js' type='text/javascript'/>
<script src='http://www.johnbhatt.com/SharedResources/scripts/shBrushCss.js' type='text/javascript'/>
<script src='http://www.johnbhatt.com/SharedResources/scripts/shBrushJScript.js' type='text/javascript'/>
<script src='http://www.johnbhatt.com/SharedResources/scripts/shBrushXml.js' type='text/javascript'/>
<script src='http://www.johnbhatt.com/SharedResources/scripts/shBrushCSharp.js' type='text/javascript'/>
<script src='http://www.johnbhatt.com/SharedResources/scripts/shBrushPhp.js' type='text/javascript'/>
<script src='http://www.johnbhatt.com/SharedResources/scripts/shBrushSql.js' type='text/javascript'/>
You need to include file that you are going to use. Above links are of default CSS style sheets and CSS, JavaScript, XML, CSharp, Php, SQL languages. XML includes HTML, XHTML and XML. Next step is to write a simple JavaScript function and tell browser to run the code.
<script type='text/javascript'>
  SyntaxHighlighter.config.bloggerMode = true;
  SyntaxHighlighter.all();
</script>
Now you are all set to write code in your post. Open editor in HTML mode and write code inside HTML pre (Pre formatted) tag with a class attribute (stylesheet identifier) defining its programming language. Lets see below example to get clear view. 
<pre class="brush:html"> // Replace your brush with your own.
<html>
<head>
<title>Adding SyntaxHighlighter to Blogger Blog by John Bhatt</title>
</head>
<body>
Body can contain codes also, that too highlighted and formatted, well aligned. Congrats.
</body>
</html>

</pre>
Important: You may have to change html tags < and > to html ISO codes. Simply open any code editor Notepad will also rock. Open Replace box using Ctrl+H shortcut or from Edit menu and search for < (Less than) and replace with <. Once again search for > (Greater than) and replace with > using Replace all method. This will not produce any error in case of HTML and other html tags.

Output is in your page. We have done this using this plugin. You have many themes (styles) to make it look better. You can include CSS as per your requirement. 
Do not forget to share and post suggestions.
+John Bhatt 
Read More
// // Leave a Comment

Feeling Great - Thanks once again

Friends,
I have started this blog just for making fun. I was not serious about blogging and even unaware also. In the early days of my internet journy, I created lots of Free websites provided by most of companies and with their own subdomains. When GeoCites (Yahoo's free hosting service) was about to shut down, I have started to search alternative. I came to know about Blogger and registered a blog named pyarb.blogspot.com. I have just posted some funny posts, you can still see in Archieves on starting days.
On 11th July 2012, I received 10,000 visitors for my blog. During this span, I have learned a lot and registered my own domain also. But I was still using Free hosting and gpEasy, WordPress, Joomla or some other PHP based cms to post blogs. When there was some problem with web hosting provider, blog becomes unavailable and I feel very frustrated. Then I continued writing my posts here. Most of posts with other CMS has been lost so this is somehow empty. One best thing about Blogger is it is Free and always up. Also being a Google product it is easy to share and make available to web.
Some milestones.

Received 10K visitors on July 2012.
Now we are about to get 50K visitors.

I was earlier using blog.johnbhatt.com as url of website. Then I switched it to www.prithviraj.com.np which was somehow not confortable for search engine and visitors also. Then I registered a domain name www.pyarb.com and copied all blogs in one place. Then the most difficult task was to redirect all users and all existing link to new domain in case of blogger where we don't have access to .htaccess file. Then I found a method to Redirect user to new domain from older domain and now all existing links and bookmarks are also working fine.

I am very thankful to each and every visitor who have been through this website. Please provide your feedback and suggestions. This will help me on further improvement.
+John Bhatt 
Read More