Advertisements
Showing posts with label Windows. Show all posts

Thursday, October 2, 2014

// // Leave a Comment

Downloading Windows 10

Hi,

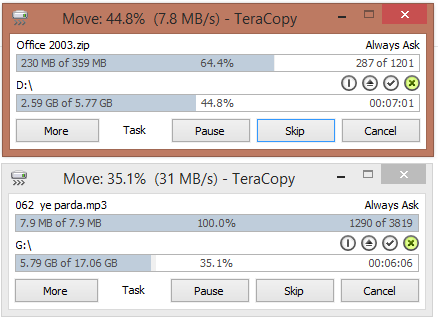
I was downloading Windows 10 Technical Preview this morning. When it was taking too long, I have asked my ISP to increase Bandwidth and they did.

Here is the screenshot. 30 MBPS, whoo! Incredible speed in India.

Feeling Excited. It is downloaded when I write this post. Will install and share some cool screens.

Keep visiting.
Read More

Wednesday, July 9, 2014

// // Leave a Comment

Software Review - Parental Control Software - Freeware

Hi,

It have been long time since last post. Today I am going to review a software that is is most useful if you work in a office and handle your IT department, If you have children at home and your want to block access to some sites without any visible changes, here is the best application for you.

Introduction:

Software name: Golden Filter Premium
Provider Company: GSI Technologies
File Name: GFPreSetup.exe
File Size: 3.10 MB
Latest Version: 3.1

Features: 

Some of the most important and required features listed below.

  • It does not create any folder or shortcut in Start Menu.
  • It does not create its files at easily visible place.
  • It does not create any taskbar icon while running. No one can know what is running in background.
  • It is totally safe (No Virus, Malware, Adware or any other kind of threat, confirmed with multiple antivirus applications. ex. MSE, Norton, AVG, QuickHeal, McAfee)
  • No listing at Add or Remove Program control panel. No one can remove it easily.
  • Can be disabled using software itself. 
  • Password Protected.
  • Toggle Function keys to show and hide application.
  • Can capture Screen and record to play later for administrator.
  • Restricted words to shut down any application running that contains such words (all supported Browsers).
  • Restricted Software
  • Hiding your important Folders
  • It is FREEWARE.

Screenshots:

Login Screen:

Home Screen:


Application Setting Screen: 
Time Based Setting Screen:
I have just included some of sample images. There a lot more control to use this application.

Download Links


Thanks for reading. One your next visit, I will be writing about the using method of this application with detailed snapshots. Please share if you find this post helpful.

Read More

Thursday, February 6, 2014

// // Leave a Comment

[Solved] Music Library not showing in Music App (Windows 8)

Hi,

I have been using Windows 8 since its early release. I have downloaded Developer Preview in November 2011. I am not sure after that how many times I have installed Windows on my Computer and upgraded its version to Consumer Preview, Release Preview, Windows 8, Windows 8 Pro, Windows Blue Preview, Windows 8.1, Windows 8.1 Pro. Might be due to many installation and security (encryption and decryption, consequent owner-user change) there must be some loss in system volume information file of of hard disc partitions.

Problem

The actual problem has arise after last upgrade. Music App in Windows 8 has left showing songs that is stored in hard disc of computer. I have tried several methods that are suggested and logical.

Situation

Out of 500 GB hard disc, approx 250 GB is filled with Videos (movies) and approx 20 GB is filled with music. Rest of space is consumed by software and other documents. So the 50 GB partition is assigned to Windows and this is the partition which is formatted frequently.

Failed Trials

However, I love Windows Media player and use this as default but being a tester, I never gave up to find the reason behind not listing of library content. I have tried following tricks or methods to solve this problem. 
  • Un-installed application and installed from Store.
  • Cleared all temporary data for application and restored its setting.
  • Changed location setting to United States or United Kingdom but none of them worked.
  • Changed Microsoft Account to local account.
  • Re-installed windows using Clean format.
  • Many more tricks that are suitable as condition and found in various social sites or as suggested by Microsoft support personnels.

Actual Problem

While none of above trials worked, I got confused and search in depth about working mechanism of Music application. Then I opened Library setting in Media player and found a wired term, which got my attention. This is showing non responsive in front of library location. Then I searched and opened Search Indexing Options in windows 8. I tried to add the audio folder in indexing location but that drive is not showing there, so that did not worked too.

The Trick

When searching for that problem, somewhere over internet I found a solution. You want to know the trick huh....
Suggestion 1: Well solution is to delete your partition, format location and re-create the partition to get its state back as it was.
Suggestion 2: Reset permission, user from security settings in drive.
First is nearly impossible for me. After following many tricks, I finally came with some solution.

I did some trick, rather than deleting partition and formatting and getting its state back, 

I moved music data to another partition which was showing properly in Search Indexing option.

In Quick:

  1. Check if you have added folder to music library. 
  2. If first step is OK, then check the status in Windows Media Player> Right click on Music in left navigation (Library view) > Manage Music Library.
  3. If this is showing non responsive then move files to other partition.
  4. If showing OK or nothing special remark, type Indexing service in smart screen.
  5. Open Indexing Service Options and click on modify to add your audio folder.
  6. Close the Indexing Options screen once you finish selecting folders. This will solve your all problems.

Finally this solved the problem for now. 

But that was too hard when you have situation like mine.
Do not forget to leave comment.
+John Bhatt 
Read More

Saturday, February 1, 2014

// // 9 comments

HTTP Error 500.23 - Internal Server Error in Visual Studio 2013

Hi,

I have installed Visual Studio 2013 in my system. Due to some problems, I got the release after few months. So I was excited to use it and taste its new features. One thing I like about Visual Studio 2013 is it has a theme which turns it like Visual Studio 2010, which was simply awesome.

HTTP Error 500.23

I opened a existing website and tried to run that website. The website was using ASP.NET framework 4.0. However, the website has no errors and working fine in previous version of Visual Studio. But when I started with debugging (F5), this produced following error.
HTTP Error 500.23 - Internal Server Error

An ASP.NET setting has been detected that does not apply in Integrated managed pipeline mode.

Solution

I can not understand the problem in a single view, as it suggest to change some configuration different methods in things you can try section. While there is not handler configured in web.config system for Web Server. Instead there was no system.webServer node.
So I searched in Internet and found some suggestion to make changes in Application Pool setting in IIS Manager. I tried that too but that was also a failed trial. Then suddenly I got a click in my mind and tried a setting which worked immediately.
How can the change done in Internet Information Service (IIS) Manager reflect in Development server. When we run the website from Visual Studio it loads in development server instead of IIS. So we have to make change in Development server which will automatically solve all the problems.
I thought, some time you might have same situation and solution must be there before problem.
Step 1: Open visual studio and click in the name of Website Project currently opened. Click on Property pane
.
Step 2: Double click on Managed Pipeline Mode. This will toggle between Classic and Integrated Mode. You have to switch to Classic mode because the error was "An ASP.NET setting has been detected that does not apply in Integrated managed pipeline mode"
.
Now hit the F5 button, here goes output as usual.

You have solved the problem. If you find this post helpful, do not forget to share with friends or simply say thanks in comment below or you can share your feedback by leaving comment below.
+Prithvi Raj Bhatt 
Read More

Sunday, December 1, 2013

// // Leave a Comment

Fix one or more Rows (Header) in Microsoft Excel

Hi,

Lets work with excel some more. After long back, I am going to continue my Excel series. Today we will learn about a very useful feature of Microsoft Excel.

Suppose we have headers in top row or 2nd or third row and lots of data. Suppose a thousand records or more. This generally happens at offices, schools and various workstations. We need to scroll down the page to view records but while it is large, we get confused with data, It is confusing that what is field header (i.e. What is data).

Lets be clear with below small example.

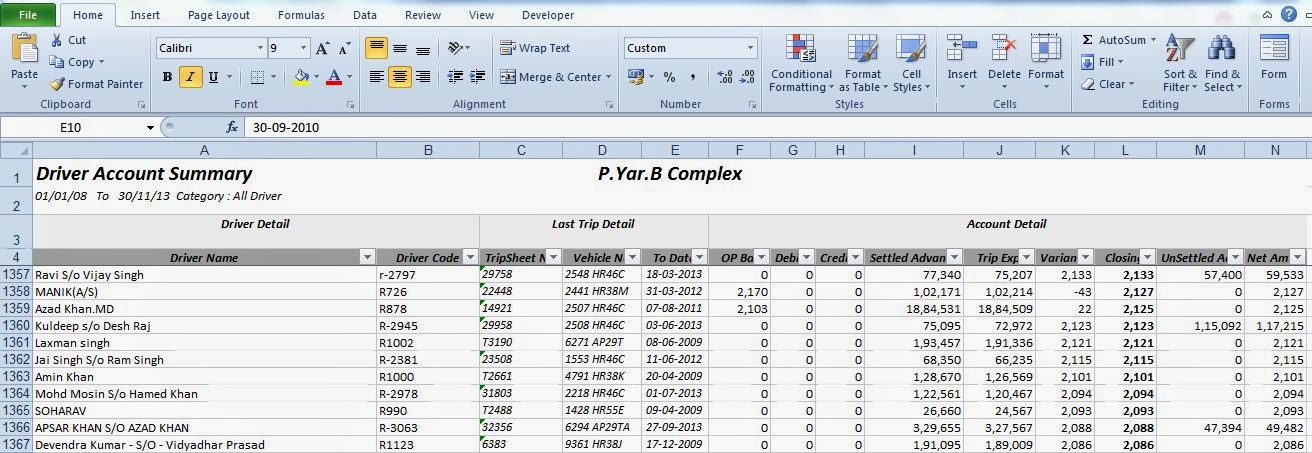
If above excel sheet. I have maintained ledger balance of Drivers of my company. This file has 2855 Rows (your file might have more or less).

While I have to view other records, I have to scroll the page. This will look like this snapshot.

What data is in column F, or G or H. If I do not remember, we have to scroll back and view headers and then come back to last position. To overcome this problem, Microsoft Excel has built-in feature called Freeze Rows or Panes. In this post, we will learn how to fix a Top row or more rows at same time.
If you are using Excel 2007, 2010 and 2013 the method is similar.

Lets go to process.

  1. If Top row of your sheet is header, you need not to do anything, But if you have headers in second or third row, Select entire row below from header row by clicking in Row name..
  2. Click on View Tab on Office Ribbon.
  3. Click on Freeze Top Row if header in First row or Freeze Panes if header in second or third row. 


Now look at this. How it looked after scrolling down.

One thing most important about this feature. Your settings are saved within file. Means if you share file with other via email or other sharing tools, your settings remains same even if Microsoft Office version changes or system varies.

All the Best. If you found if helpful, do not forget to post a thank or +1 on Google.
+John Bhatt 
Read More

Monday, October 28, 2013

// // Leave a Comment

Change Login Screen Background in Windows 7

Hi,

Most of you are working with your computer and must have Windows 7 as main operating system. Windows 7 is the most stable and complete Operating system from Microsoft after Windows XP. There are many themes and background images available for Windows 7 in Microsoft personalization page.

As you have seen many Users using Windows 8 and their custom Lock Screen backgrounds. Means when they start windows they have a nice and custom background to Windows Login screen. However, Login Screen is same for all but the Background Image can be changed as per users choice.

But we have Windows 7 and I think this to do with Windows 7 also. In this post, we are going to change the background image of Login Screen of Windows 7 from default to any of your desired one. You can simply edit the same wallpaper and write some text there.

Lets start. Here we have two methods to do. One is simple and done with graphical method. Less chances of Damage to your OS. I will discuss the Manual method to change the Registry in another post sometime later.

Be-ware, you are doing this entirely on your own risk. In case anything wrong value changed or in case of misshapen, you will face entire loss and there will not be any fault of mine. I am providing tested and checked procedure and codes with screenshots.

Here is your normal Lock Screen (Login Screen in windows 7).

Download this Registry File: Custom background in Windows 7

Now extract the Zip file and open Registry file. You will see the screen like below.


Click Yes on User Account Control prompt. Next prompt will be like this.


Click Yes. This will modify value of a key in Registry of your Windows. You will see confirmation like below screen.


Now we can start working on our task. Lets get back to Windows Explorer and navigate to this address.


  • %windir%\system32\oobe
  • Create a New folder and rename to info.
  • Open info (newly created folder), Create a New Folder and rename to backgrounds.
  • Now paste/move your favourite image to newly created folder backgrounds.
  • Rename the wallpaper file to backgroundDefault.jpg.
Folder structure and names as same in above or in Screenshot.


Remember, Background image must be in JPEG format. Other formats will not work. 
Now have a look at your newly changed Background of Login Screen.

Lock your screen or Reboot your computer to see the changes. You might not see the background if you have single user account in Operating system without password and fast hardware resources. Press Windows+L key to go to Lock screen and see the changes. Below is mine.

Enjoy. 

Don't forget to subscribe to our posts and write comments. Bitter, funny or sweet, we will love them all.
+John Bhatt 
Read More

Sunday, September 29, 2013

// // Leave a Comment

Update Album Art of Song in Windows

Hey,

We everybody here loves Music. Must have collected many songs of their choice and I am sure, that collection is downloaded from Internet or loaded from any mobile shop.

How do you feel, when you see any Website Image (Logo), Mobile shop's Image or some other Actors photo while playing media in Media Player.  I am sure, it should make you panic
and also frustrating.
Or the scene might be opposite also, you bought some Music from Internet or elsewhere, But that has some other Artists image there or wrong album image published.
So, you might like to change that Image to your favourite Image or your own creation. I have a solution.

Requirements

 
  1. Microsoft Windows 7,8,8.1 (Tested).
  2. MP3 or other Media Player Supported format.
  3. Image of your choice.

Procedure

 
  1. Copy Image of your choice.
  2. Open Windows Media Player.
  3. Search for your MP3 File or Album.
  4. Right Click on Album Art of Song.
  5. Choose Paste Album Art Option and wait for sometime, if there are a lot of Files.

Other Keywords and search terms:
Change Background Image of MP3, Change Album Art, Remove Photo from Mp3, Media Player Customization, Set Image as mp3 background.
 
Here you go. Your Album Art is updated now.
 
Keep visiting for more posts.
 
Read More
// // Leave a Comment

Mail App (Windows 8) Keyboard Shortcuts

Hi,

Today, I have collected the List of Keyboard shortcuts for Windows 8 Mail App. I know you must be  using Mail App if you have Windows 8 or Windows 8.1.

There are some problems with Older shortcut of Mail App (Outlook) in previous windows.


Here is the complete list of Keyboard combination to perform your task easily and in timely manner.
 
Combination Function/Output
Ctrl+R Reply
Ctrl+Shift+R Reply all
Ctrl+F Forward
Ctrl+M Move item to a folder
Ctrl+J Toggle between marking a message as junk or not junk
Ctrl+Shift+U Show only unread messages
Ctrl+Shift+A Show all messages
Ctrl+Shift+E Show Folder options
Ctrl+U Mark as unread
Ctrl+Q Mark as read
Ctrl+A Select all messages
Insert Toggle between Flag and Remove flag for messages
Ctrl+N New Message
F5 Sync
Alt+B Put focus on the bcc button
Alt+C Put focus on the cc button / Accept
Alt+D Decline
Alt+T Put focus on the To button / Tentative
Alt+V Open the invitation in Calendar
Alt+S Send mail
Alt+I Insert attachment
Ctrl+Shift+F Select a font
Ctrl+Spacebar Clear formatting
Ctrl+Y Redo
F4 Redo
Ctrl+[ Increase font size one point
Ctrl+] Decrease font size one point
Ctrl+Shift+, Decrease font size
Ctrl+Shift+. Increase font size
Ctrl+K Add a link
Ctrl+E Center
Ctrl+L Left
Ctrl+R Right
Ctrl+Shift+L Bullets
Ctrl+M Indent when text is selected
Ctrl+Shift+M Outdent
Tab or Shift+Tab Indent/outdent when text is selected or when focus is in a list
Ctrl+' Acute accent
Ctrl+, Cedilla accent
Ctrl+Shift+6 Circumflex accent
Ctrl+Shift+; Diaeresis accent
Ctrl+` Grave accent
Ctrl+Shift+7 Ligature accent
Ctrl+Shift+2 Ring accent
Ctrl+/ Slash accent
Ctrl+Shift+` Tilde accent
Alt+Ctrl+Shift+1 Inverted exclamation mark
Alt+Ctrl+Shift+/ Inverted question mark

Hope these will be helpful in your working. Keep visiting.

+John Bhatt 
Read More

Sunday, May 20, 2012

// // Leave a Comment

Remove File Association

Hi,
Here is a very useful software for you. You can download it free from our server and use it for your development and study.
Are you in trouble that your System Opens all types of Software with MS-Paint, or Notepad, or VLC Media Player or any other Applications, Desktop Short-cuts not working.

Mr. Ramesh Srinivasan, the developer of this application has defined this as "This utility helps you un-associate a file type quickly in your Windows Vista or Windows 7 PC. Windows 7 & Vista do not provide a GUI option to un-associate file types. That's the reason I wrote this simple tool."

We have found and collected a Very useful Utility that is Free of cost and for you only.

Application name: Unassoc.exe

File Name: unassoc_1_4.zip

File Size: 54.7 KB

Program Name: File Association Remover for Windows Vista/7

Download Link: Un Association 

Procedure to install:
Simply download it and extract it, It does not need to install, Just Run it with Admin Rights. Then Type .ink for Shortcuts of Applications and Click Remove Association. Same for other File Extensions. (File Checked and Verified. No Malware, No Virus clean utility).

If some problem arises during or after installation, you can ask me using email or comment on this post.

Enjoy your work.
Read More